In my U.S. experience, every person asks me, "Oh, this is a little bit spicy, but you came from South Korea; I'm sure you are OK. " Sure, I like spicy food really much. However, we have yet to learn about every South Korean people's taste type. In Yummirific data, we collected 3,397 people's taste preference data with 40 survey questions. Fortunately, we covered that "SPICY." Our question number 8 aligns with "SPICY." "I like spicy food." So, I analyzed 3,397 people's responded data related to basic tasty preferences, Sour, Bitter, Salty, Sweety, and "SPICY. Here are some fun facts about it.
정군's 개발 환경 세팅
(3) 아파치 웹서버 (Apache httpd) + PHP 7 + STS PHP 개발 환경 세팅
1. 아파치 웹 서버 다운로드 (Apache httpd Download)
다운로드 주소 ▼https://archive.apache.org/dist/httpd/binaries/win32/
저는 개인적으로 워드프레스로 만들어진 사이트를 하나 더 운영하고 있습니다.
결국, 최대한 같은 환경 (STS)에서 JSP, PHP를 모두 개발 할 수 있도록 하는게 제일 편한 상황이죠. 일단 그래서 PHP 구동을 하기 위해 먼저 아파치 웹서버를 먼저 설치해야 합니다.
아파치 웹서버의 윈도우 설치는 msi 파일로 검색해서 바로 설치하는 편이 사실 편합니다. centOS 에 설치하는 것은 yum이 있어서 편하기도 하고, 컴파일 해서 설치하기도 하는데 개발환경이니까 그리고 귀찮으니까 일단 msi 파일로 설치하겠습니다.
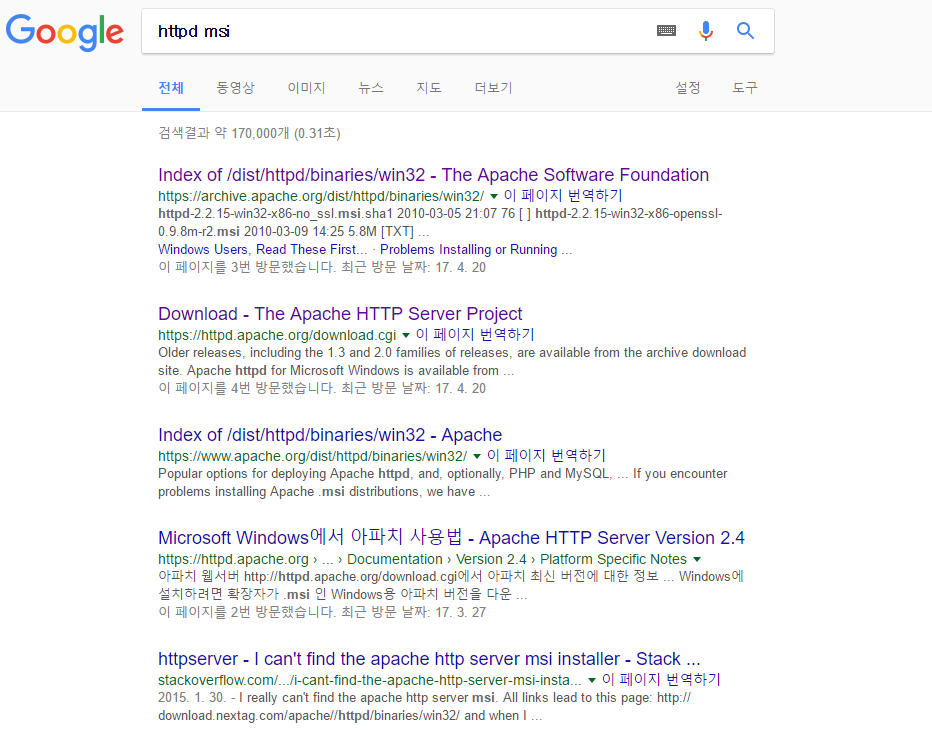
저 위의 주소에서는 window binary 파일을 버전 별로 다운 받을 수 있습니다. 저 주소는 구글에서 "httpd msi" 로 검색하는 편이 편합니다.
제일 위의 링크 입니다.
링크를 클릭하면. 후...
네...
폴더 내의 파일이 그냥 보입니다. 자세히 보시면 apache_버전-win32-x86.확장자의 형태로 여러가지 파일이 있습니다. 휠을 아래로 쭈~욱 쭈욱 돌리다 보면 가장 최신 버전이 2.2 버전으로 있습니다. 아...근런데 뭔가 이상합니다. x86이네요. 그렇습니다. 32bit네요. 망했어요...
결국 다시 검색해서 win64 파일 누군가 컴파일 해놓은 것을 찾았습니다.
역시 Stack over flow는 사랑입니다.
아파치 64bit msi 설치버전 다운로드
네. 결국 별도로 다운로드 링크를 만들었 습니다. 2.2 버전으로 만든 설치 파일이네요.
자 이제 설치를 실행 합니다. 압축을 풀어보니 msi 버전이 아니내요. OTL
별수 없습니다. 32bit은 위의 링크에서 받아서 다음다음다음 하면 작업표시줄에 서비스로 아파치가 실행됩니다. 서버 시작과 재시작 등이 마우스 우클릭 옵션으로 가능하니 편합니다.
그래도 위의 버전은 일단 ReadMe 파일이 있습니다.
Visual Studio 2010 SP1 x64를 이용해서 빌드했군요. Visual C++ 2010 SP1 Redistributable Package x64가 설치되어 있지 않으면 먼저 설치하라고 설명 되어 있습니다.
다운로드 링크 ▼
http://www.microsoft.com/download/en/details.aspx?id=13523
C:/Apache2 폴더에 압축을 푼 후 사용하라고 합니다.
해보겠습니다.
압축을 푼 후 Apache2/bin/ 폴더로 이동하면 httpd.exe가 있습니다.
실행!
httpd.exe: Could not reliably determine the server's fully qualified domain name, using fe80::4015:b7cf:d006:5619 for ServerName
네. 한번에 될리가 없죠.
그래도 많이 보던 오류 입니다. ServerName 이 qualified 하지 않다는 거 같네요.
Apache2/conf/ 로 이동해 봅니다.
Apache 랑 친해지면 자연스럽게 함께 지낼 수밖에 없죠. httpd.conf 파일을 메모장으로 열어봅니다.
httpd.conf 파일은 아파치 설정 때문에 자주 열게 됩니다. 원본 파일은 잘 백업해 두세요.
아래를 잘 찾다 보면 대충 요런 부분들이 나타납니다.
(# 이붙은 줄은 주석처리 된 곳입니다)
# ServerAdmin: Your address, where problems with the server should be
# e-mailed. This address appears on some server-generated pages, such
# as error documents. e.g. admin@your-domain.com
#
ServerAdmin admin@example.com
#
# ServerName gives the name and port that the server uses to identify itself.
# This can often be determined automatically, but we recommend you specify
# it explicitly to prevent problems during startup.
#
# If your host doesn't have a registered DNS name, enter its IP address here.
#
#ServerName www.example.com:80
앗! ServerName www.example.com:80 이 주석 처리되어 있군요.
이 서버는 서버 이름이 없다고 할만하네요. 네.
앞에 있는 #을 지워 주석을 제거하고 localhost:80 또는 127.0.01:80처럼 개발용 주소로 바꿔 줍니다.
저장하고 다시 httpd.exe를 실행하면 서버가 돌기 시작합니다. 근데...왜 커맨드 창이 안 없어질까요? = =??....멋지게 이 컴파일 버전은 사용자의 편의 따윈 없었습니다. ReadMe를 잘 읽어 보니 서비스로 인스톨 해야하는 것을 상세히(?) 설명해 놨네요.
Window 키 입력 후 cmd를 치면 커맨드가 나타납니다(검색).
실행 시키기 전에 우클릭을 해서 관리자 권한으로 실행 시켜주세요.
창이 나타났습니다.
네.
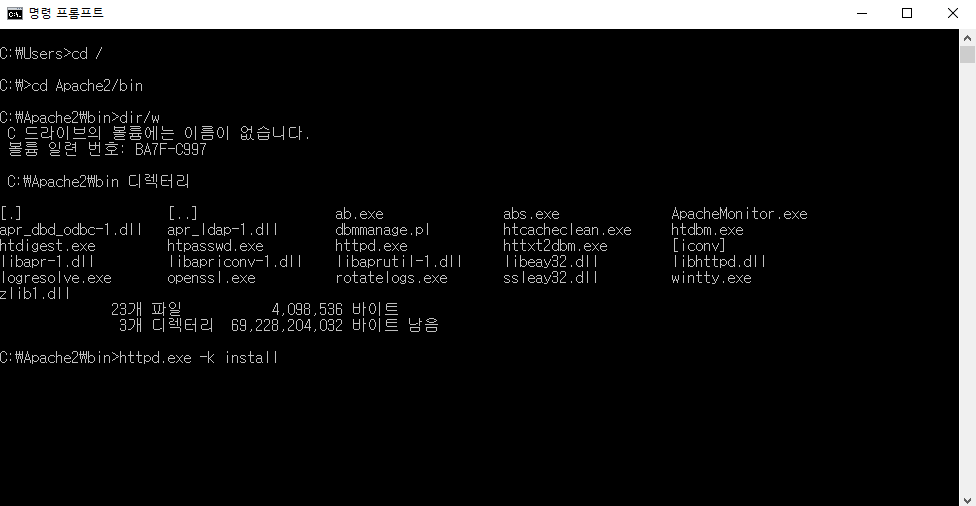
c:/Apache2/bin>httpd.exe -k install
입력하면 윈도우 서비스로 등록이 됩니다.
네 이제 거의 끝났습니다.
커맨드 창은 필요없으니 닫아버리고, 다시
c:/Apache2/bin/ 폴더로 가보세요.
ApacheMonitor.exe 파일이 있습니다.
이걸 실행 시키면 작업관리줄에 아파치모니터링 아이콘이 생깁니다.
자 우클릭을 하면 메뉴도 단촐하게 start / restart / stop 이 있습니다.
start를 클릭!
It works!
네 이거 한줄 보기가 이렇게 걸렸습니다.
정말 잘 돌고 있는 것인지 궁금하면
c:/Apache2/htdocs/ 로 가봅니다.
index.html 파일이 달랑 있습니다. 메모장으로 뜯어봐야겠죠?
<html><body><h1>It works!</h1></body></html>
네....
한줄 있네요.
한줄은 뭔가 심심하니까 아래 코드를 넣어보겠습니다.
<!doctype html>
<html>
<head>
<style>
* {box-sizing: border-box;}
body {background-color: #3aa3aa; color: #fff;}
.container {margin: 40px auto 20px; width: 250px;}
.clock {border: 5px solid #FFF; border-radius: 100%; display: block; height: 250px; width: 250px; position: relative;}
.clock div{background: #fff;height: 0; left: 50%; position: absolute; top: 50%; width: 0; -webkit-transform-origin: 50% 100%; -moz-transform-origin: 50% 100%; -o-transform-origin: 50% 100%; -ms-transform-origin: 50% 100%; transform-origin: 50% 100%;}
.clock .hour {margin: -60px -2px 0; padding: 60px 2px 0;}
.clock .minute{margin: -85px -2px 0; padding: 85px 2px 0;}
.clock .second{margin: -105px -1px 0; padding: 105px 1px 0;}
</style>
<script src="https://code.jquery.com/jquery-3.2.1.min.js"></script>
</head>
<body>
<h1>It works!</h1>
<div class="container"><div class="clock"><div class="hour"></div><div class="minute"></div><div class="second"></div></div></div>
</body>
<script>
function clock() {
var dt = new Date();
var b = dt.getSeconds() * 6;
var a = dt.getMinutes() * 6;
var o = dt.getHours() % 12 / 12 * 360 + (a / 12);
$(".hour").css("transform", "rotate(" + o + "deg)");
$(".minute").css("transform", "rotate(" + a + "deg)");
$(".second").css("transform", "rotate(" + b + "deg)");
}
function refreshClock() {clock(), setTimeout(refreshClock, 1000)}
refreshClock();
</script>
</html>
참고 ▼
http://codepen.io/WinterJoey/
Referenced from Joseph Shambrook's Float Clock Source. on Codepen
Changing Less to CSS and Adding Second variable.
네. 지금 오전 1시가 넘었군요........OTL
일단 이제 아파치 설치 까지는 끝났습니다.
남은 PHP 세팅은 조금 후에 다시 시작하겠습니다.


내 권장 PHP IDE는 Codelobster입니다.
ReplyDelete